HOT STANDBY ROUTING PROTOCOL (HSRP) - A Deep Dive

Introduction:
Hot Standby Routing Protocol (HSRP) is a Cisco proprietary redundancy protocol. It was developed by Cisco and specified in IETF. This protocol protects against the failure of the first hop router when the source host cannot learn the IP address of the first hop router dynamically.
Concepts:
HSRP ensures that only a single router called the active router is forwarding packets on behalf of the virtual router. A standby router is a backup to be ready to become the active router, in the event that the current active router fails. Once these are determined, the failure of an active router will not cause any interruption of connectivity.
HSRP defines a standby group, and each standby group that define includes the following routers:
Virtual Router: The primary router with the highest configured priority will act as a virtual router with a pre-defined gateway IP address and will respond to the ARP request from machines connected to the LAN with a virtual MAC address. If the primary router fails, the router with the next-highest priority would take over the gateway IP address and answer ARP requests with the same MAC address, thus achieving default gateway fail over.
Active Router: The active router is the physical router that receives data sent to the virtual router address and routes it onward to its various destinations. Active router also sends periodic hello messages to standby router.
Standby router: The standby router is the backup to the active router. Its job is to monitor the status of the HSRP group and quickly take over packet-forwarding responsibilities if the active router fails or loses communication. Both the active and standby routers transmit Hello messages to inform all other routers in the group of their role and status.
Other routers: An HSRP group can include additional routers, which are members of the group but they don’t take the primary roles of either active or standby states. These routers monitor the Hello messages sent by the active and standby routers to ensure that an active and standby router exists for the HSRP group that they belong to. They will forward data that’s specifically addressed to their own IP addresses, but they will never forward data addressed to the virtual router unless elected to the active or standby state.
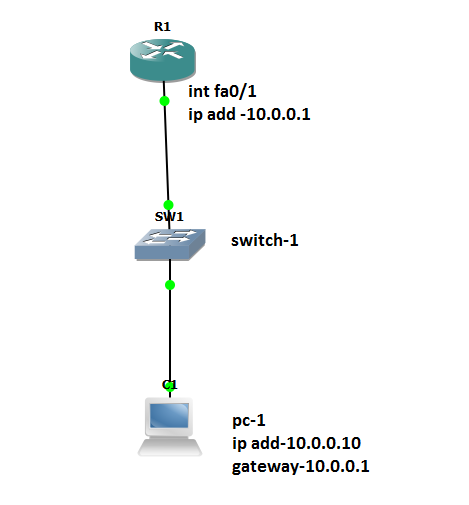
Diagram: In this topology, we have to set the default gateway to Fa0/0 interface (with the IP address 10.0.0.1) of the router. This can be done manually or automatically via DHCP.
Example-1
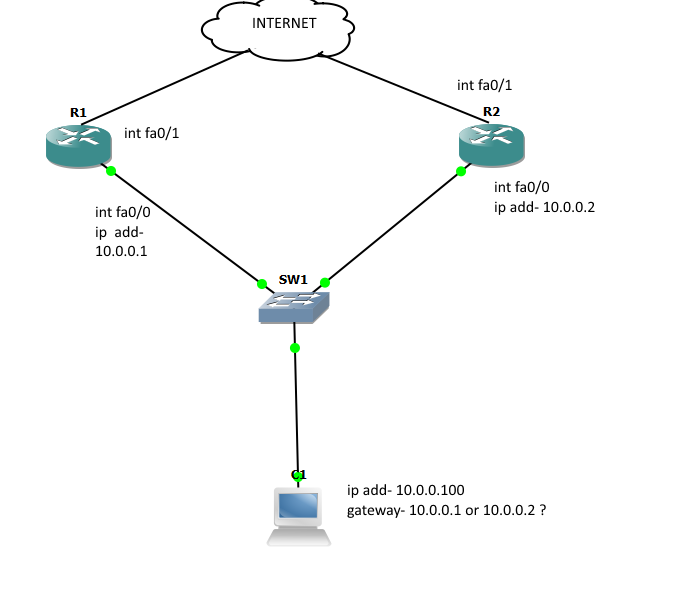
After some time, you want to implement some redundant methods so that even the Router fails, all PCs can still access the Internet without any manual configuration at that time. So we need one more router to connect to the Internet as the topology below:
Example-2:
But now we have a problem: There is only one default gateway on each host, so if Router1 is down and we want to access the Internet via Router2, we have to change the default gateway (to 10.0.0.2). Also, when Router1 comes back we have to manually change back to the IP address on Router1. And no one can access to the Internet in the time of changing the default gateway. HSRP can solve all these problems!
With HSRP, two routers Router1 and Router2 in this case will be seen as only one router. HSRP uses a virtual MAC and IP address for the two routers to represent with hosts as a single default gateway. For example, the virtual IP address is 10.0.0.10 and the virtual MAC is 0000.0c07.AC0A. All the hosts will point their default gateway to this IP address.
Example-3:
What is Virtual MAC Address?
The HSRP MAC address has only one variable piece in it. The first 24 bits still identify the vendor who manufactured the device (the organizationally unique identifier, or OUI).The next 16 bits in the address tell us that the MAC address is a well-known HSRP MAC address. Finally, the last 8 bits of the address are the hexadecimal representation of the HSRP group number. The virtual MAC address of HSRP version 1 is 0000.0C07.ACxx, where xx is the HSRP group number in hexadecimal based on the respective interface.
HSRP hello packets are sent to multicast address 224.0.0.2.
Step-by-Step Instructions:
Step-1: Reference to above scenario on ROUTER1 run command:
Step-2: ON ROUTER-2
HSRP Features:
Pre-emption: The HSRP pre-emption feature enables the router with highest priority to immediately become the Active router. Priority is determined first by the priority value that you configure, and then by the IP address. In each case a higher value is of greater priority.
Step-3: Now we want that router-2 will become active and router-1 will be at standby mode, for that we have to increase the priority of router-2 and enable pre-empt on router-2.
Interface Tracking:
Interface tracking allows us to specify that another interface on the router for the HSRP process to monitor.
If the specified interface's line protocol goes down, the HSRP priority of this router is reduced, allowing another HSRP router with higher priority can become active (if pre emption is enabled).
Step-4: Now, in this topology we will run command interface tracking on router-2 because r2 is at active state.
-How to run command?
First, we have to go on CLI of router-2 and then on that interface where we enabled HSRP i.e fastethernet 0/0 the following commands needs to run:
Now, you have to know that on which interface you want HSRP to start its tracking and in this case, I want to track my fa0/1 on router-2, so that if any case fa0/1 goes down HSRP will have that information.
Again, what is Decrement value?
Decrement value:
When multiple tracked interfaces are down, the priority is reduced by a cumulative amount. If you explicitly set the decrement value, then the value is decreased by that amount if that interface is down. If you do not set an explicit decrement value, then the value is decreased by 10 for each interface that goes down.
Here, I set my decrement value to 30 because the priority of router-2 was 120(earlier I increased the priority to 120).
Now, I will shut down my interface fa0/1 on router-2
Then, with the help of HSRP interface tracking on router-2 decrement its priority and router-1 will become active:
On router-2
On router-1
Timers:
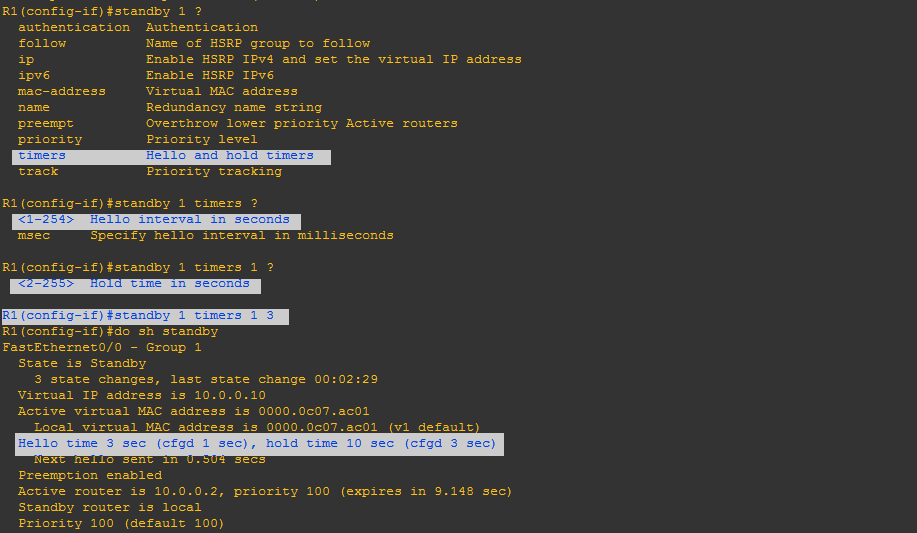
Hello timer: The hello timer is the defined interval during which each of the routers send out Hello messages. Their default interval is 3 seconds and they identify the state that each router is in.
Hold timer: The hold timer specifies the interval the standby router uses to determine whether the active router is offline or out of communication. By default, the hold timer is 10 seconds, three times the default for the hello timer.
Step-5: To check the timers, the command is: show standby
Here, default timers are 3 sec for hello and 10 sec for hold. If you want to change timers, you can by running following commands:
Authentication:
HSRP authentication protects against false HSRP hello packets causing a denial-of-service attack. For example, Device A has a priority of 120 and is the active device. If a host sends spoof HSRP hello packets with a priority of 130, then Device A stops being the active device. If Device A has authentication configured such that the spoof HSRP hello packets are ignored, Device A will remain the active device
HSRP packets will be rejected in any of the following cases:
- The authentication schemes differ on the device and in the incoming packets.
- Text authentication strings differ on the device and in the incoming packet.
HSRP has two authentication schemes:
- Plain text authentication
- MD5 authentication
Configuring HSRP MD5 Authentication Using a Key Chain
- We are performing this task to configure HSRP MD5 authentication by using a key chain. HSRP will query the appropriate key chain to obtain the current live key and key ID for the specified key chain.
On router-2:
Step-6: First we have to configure a key-chain:
Now,Configures an authentication MD5 key chain for HSRP MD5 authentication.
- The key chain name must match that name we specified earlier.
After enabling authentication on router-2, it will show some error messages like bad authentication. And router-1 will also show same error messages.
Why R1 and R2 are showing Bad Authentication?
-Because we have enabled authentication on only router-2 and router-2 will send HSRP hello packets with authentication towards router-1 and router-1 will send HSRP hello packets without authentication towards router-2, so now there will be an authentication mismatch.
On router-1 we have to enable same authentication, by following commands for running HSRP.
This topic is part of CCNP R&S Training.
Vivek Rana Trainer - CCNA and CCNP R&S
Network Bulls
- RECOMMENDED POSTS
-
Trending (0)

-
Network Bulls Placements (53)

-
CCIE (101)

-
CCNP (32)

-
CCNA (40)

-
Awards (14)

-
Network Bulls Reviews (53)

-
Informational Articles (74)

-
Technical Articles (26)

-
CCIE Success Stories (40)

-
Summer Training Courses (5)

-
CCIE Security Version 5 (34)

-
CCIE Data Center (19)

-
MCSE (3)

-
Industrial Training (10)

-
Microsoft Certification (3)

-
Ask NB (7)

-
Network Bulls Offers (6)

-
Best Institute for CCIE Training in India (118)

-
CCIE Training Courses (78)

-
DHCP (2)

-
Webinars (6)

-
Training (128)


Great information, keep coming up with such posts...